In order to change something from one form of matter to another it seems to me that various inputs need to be applied. In order for a tree to become a house it must first be cut down and taken to a sawmill where it will be cut into usable lumber. Then it must be delivered to skilled carpenters who will carry out the home construction.
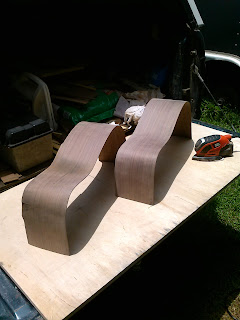
In order for a tree to become a guitar it must follow a similar path until it gets to that last part. I suppose this piece of black walnut would have had an easier time becoming a guitar had it fallen into the hands of a skilled craftsman but instead it fell into the hands of an enthusiastic rookie. I have cut it where I shouldn’t have, I have sanded it too thin, and I have scorched it with too much heat. So far none of my mistakes have been catastrophic but let’s just say that the tailgate guitar is going to have plenty of character.
Other guitar builders have written that one of the most fun steps in the building process is bending the sides. That’s what I did this past week. It was fun. It was also a little anxiety producing because I really wanted to get it right and the opportunities to screw it up were numerous. I don’t want to waste any of this wood.
In order to transform a nice straight piece of wood into a beautiful, curvy side to an acoustic guitar you have to apply heat, moisture, and pressure. Some people say the wood should soak awhile before you start, others say a light spritzing is all you need. I went with the garden hose method. After all, I’m building this guitar in the backyard on the tailgate of my truck and there’s a hose handy. First I wet the wood, then I wrapped it in aluminum foil, and then I applied the heat. I started to buy a little propane torch for the heat source but my imagination showed me several scenarios of potential disaster so I bought an electric heat gun instead. Heat guns are used to remove paint and wallpaper and now to heat up metal pipes for guitar builders. It’s really a blow dryer on steroids.
The heat gun blows hot air into the pipe, which in turn becomes quite hot. The wrapped up wood rests on the pipe at the spot that needs bending. When the wood reaches the correct temperature it becomes pliable and the transformation begins. After the bend is pretty close I put the wood on the shaping form that I made earlier and clamp it. This process continues until the whole side is shaped like I want it. I didn’t get it perfect but it’s close. I practiced a little ahead of time and I’m glad that I did because there’s definitely a learning curve. It’s starting to look like a guitar.
 |
| the side bending apparatus |
 |
| first try on a piece of scrap wood |
 |
| I'm getting smarter here. I wrapped the wood in wet rags then in foil before I started heating. Results improved dramatically. |
 |
| see the shadow in the waist on the one on the left? that's a scorch mark from staying in one place too long |
 |
| This is the large end of both sides. They will come together at dead center. Notice how the grain lines up. Pretty cool! |
 |
| Here I'm test fitting the top to the side and marking it with a pencil. Remember the top has a slight arch so I can't just leave the edges flat. |
 |
| Trimming away the excess with a coping saw. This is a day or two after the bending and I'm using the pipe for support, it's not hot. |
No comments:
Post a Comment